cover pic

cover pic

Monday, June 29, 2015

Antiquing for Desks on a Cool, Rainy Weekend


Here in the Alleghenies we had a weekend with lots of rain and temperatures that barely hit the sixty degree mark.  To fill an afternoon, my husband and I went antique shopping with my parents-in-law who were visiting from out of town.  I am in desperate need of some kind of desk to hold a laptop computer and small printer.  For now it needs to be housed in a corner of our farm kitchen, so it can't be too ornate.  Something simple, not modern, and in a country style would be ideal.


This is what is sitting there now, and as you can see, it will not do.


This does not at all go with the style of this house, but it's what we had when we moved here, and it served its purpose.  However, it is definitely time to move on.


I like this walnut schoolmaster's desk, but when it opens, it sits out relatively far from the wall, and I'm afraid it will block the back door.


This was the favorite of my mother-in-law.  It is simple and would match much of the oak furniture in our house, plus it has a shelf underneath to hold the printer.


I loved this mahogany secretary's desk, but with its claw feet, darker wood, and decorative features, I'm afraid it will be too Victorian looking for this house.


If you can see beyond all the items on top, this cherry secretary desk is nice; although, it's a little on the smaller side.


This olive wood desk was quite unique, but I'm just not sure it's the right fit for my kitchen.


Finally, there was this interesting desk that opens up and has a built-in bookshelf on the back side.  However, we could not figure out how to place it in the kitchen and be able to use the bookshelf since I need to push it up against the wall.

All the desks we looked at were in the $150-$600 range.  I cannot make up my mind, and would love some input from others with more experience in antique furnishings.

Which one do you think would be the perfect fit for my century-old farmhouse?


Saturday, June 27, 2015

Summer Traditions #3: Shelling Peas on the Porch


Although my parents no longer keep a vegetable garden, we did always have one in the summer when I was growing up.  My sister and I were responsible for tossing out rocks (a job that we hated) and helping shell peas, snap beans, and shuck corn.  My mother would then blanch and freeze dozens of little plastic baggies stuffed full of the produce for us to consume in the winter.  I actually liked shelling peas.  We would sit on the porch and talk and sample a few of the delicious raw sweet peas while we worked.  Corn shucking was just as fun as we eagerly anticipated eating the mouth watering corn on the cob dripping with melted butter and salt later in the day.

I picked the last of our sugar peas the other day, and our youngest patiently helped me shell peas while we swung on the porch swing, talking and watching the butterflies and bumblebees retrieve nectar from the flowering bushes next to us.  Any peas that popped out of the shells and missed the bowl were played with by one of our cats as she ran all over the porch chasing and pawing at the pea like a hockey player after a puck.  It took us about an hour to shell one basket of peas, and in the end, we only froze 2 quarts.  Now this was our fourth harvesting, and we also got a meal out of all the baby sugar peas still in their pods, which are truly the best.  However, when I can buy a pound of frozen organic peas for $2, it sometimes makes me question whether it was worth the total time of 3 hours that it took me to pick, sort, shell, and bag those peas.  But how do you put a price on knowing that the food you are serving your family came from your own hands and land?  Not to mention that the childhood experience of shelling peas on the porch swing with your mama wouldn't exist if I purchased all our produce from the supermarket.  So I will carry on this childhood tradition as well and hope that my children will grow up to cherish these memories as much as I do.

Wednesday, June 24, 2015

Berry Picking in the Mountains


We awoke this morning to a blue sky, a slight breeze, and much lower humidity.  It was a perfect day for berry picking!


There were so many wild black raspberries to pick, and this is only the beginning of the season.  It's probably the best crop I have seen since we moved back up to the Alleghenies.


I could only persuade the youngest two to help me today.


They were troopers though, and they braved the bugs, the barbed wire, and the prickles.


This was after half way through the berry patch.  We left a lot behind.


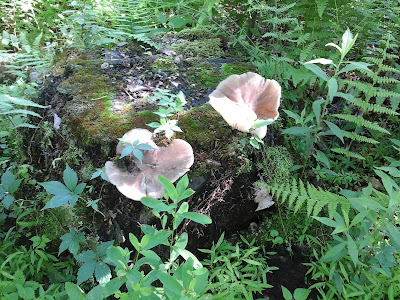
We saw these amazingly beautiful fungi growing on a stump.  Each was about the size of a softball.  I'm not sure what these are called.  I need to look them up in one of our field guides.


We were doing great and filling our containers until my six year old dropped hers and lost them all.


This is just one of our filled bowls.  We ended up with about three of these after 40 minutes.


Our plan is to turn them into one of these delicious raspberry pies that our 13 year old daughter routinely makes.  She has taken over as the official pie and cake baker of our house.

Black Raspberry Pie
1 cup sugar
1 quart fresh raspberries
2 cups flour
1 tsp. salt
2/3 cup shortening or lard or coconut oil
6-7 tablespoons cold water

Combine sugar and raspberries in a bowl and let soak overnight.  For the crust: In a bowl, stir together flour and salt.  Cut in shortening or lard till pieces are about the size of small peas.  Sprinkle 1 tablespoon of water over part of mixture and toss with fork.  Repeat with water until all is moistened.  Form dough into 2 balls.  Roll out 1 dough ball on a floured surface, forming a circle.  Fit into pie plate and trim at rim if necessary.  Roll out remaining dough the same way for the top crust.  Fill pie crust with the berry/sugar mixture.  Slice the top pie crust into strips and weave onto top of pie in basket weave fashion.  If you decide not to do this and choose to place the entire crust over the top, then pinch seams together and cut slits in top to allow steam to escape.  Cover edge of pie with foil to prevent burning and bake in 375 degree oven for 20 minutes.  Then remove the foil and bake another 25-30 minutes or until golden.  Cool.

Sunday, June 21, 2015

Off to a Summer Dessert Social

This weekend, we were invited to celebrate the official beginning of summer at the small farm of another large family who is hosting a dessert social.  We love attending this family's seasonal outdoor parties because they have the most organized hobby farm, a ton of other children there to play with, adorable farm animals, and the best food served up and eaten under the roof of their immaculate barn.  I am always inspired to do more on our own little farm after leaving there.  The last event in the fall was a stone soup supper with one huge kettle of stone soup with real turtle meat included and another steaming kettle of hearty beef stew.  I have to admit that I chickened out and had the delicious beef/veggie stew.  My husband is more adventurous than I and thoroughly enjoyed the turtle soup though.

Petite Cherry Cheesecakes and Lemon Squares
Since this was a dessert night, I wanted to bring something sweet and summery that would be easy to eat with our fingers.  I opted for these petite cherry cheesecakes and lemon squares.  My 10 year old son begged me to let him help since he has decided he wants to learn how to cook and bake this summer.  He is my big eater, and he has learned through the years that the one who helps Mom in the kitchen is also the most likely to reap the rewards of licking beaters, scraping the bowl, and getting the chocolate chips or other sweet morsels that might spill out of the bag.  His little sister, who also wanted to help for the same reasons, was relegated by him to be the placer of the cupcake liners in the muffin tins before we started.  Therefore, she was out of the kitchen when it was beater licking time.

Petite Cherry Cheesecakes
2 (8 oz.) package cream cheese, softened          1 tsp. vanilla
3/4 cup sugar                                                      24 vanilla wafers
2 eggs                                                                 1 (24oz.) can cherry pie filling
1 tsp. lemon juice

Beat cream cheese, sugar, eggs, lemon juice and vanilla until light and fluffy.

Line small muffin pans with paper baking cups and place a vanilla wafer in bottom of each cup.

Fill with cream cheese mixture.

Bake at 375 degrees for 15-20 minutes, or until set.
Top each with about 1 Tbsp. of pie filling.  Chill.  Makes 2 dozen.

Finished Petite Cherry Cheesecakes

I had the help of my 13 year old daughter when making the lemon bars while most everyone else was out swimming in the pool after helping their dad move mulch into the many flower beds.  She just couldn't seem to be able to keep her older brother from coming in and out when he sensed we had emptied the bowl into the cake pan so he could get the scrapings.  Honestly, when there is baking going on, I seem to have very interested and willing helpers.  I wish they were as eager to help wash the dishes and hang the laundry.

Lemon Squares
Box lemon cake mix
1 stick butter, softened
1 egg, beaten

Mix these 3 ingredients until crumbly/mushy and press into 9x13 cake pan.  I think it's the consistency of semi-dry playdough.

Top Layer:
2 eggs, beaten                                                       1 pound bag of powdered sugar
1 8 oz. package cream cheese, softened               1 tsp. vanilla

Mix all these ingredients until creamy, and pour over crust and bake 50 minutes - 1 hour at 325 degrees.  (I love my pink polka dotted spatula found in a bargain bin at Giant!)

After cooling, cut into squares and dust with powdered sugar.  I chill mine in the refrigerator.
Finished Lemon Squares


After changing into something a bit more casual, we are off.  I can't wait to sample the sweet treats that others will be bringing.  Happy Summer, Everyone!


Wednesday, June 17, 2015

Slow Summer Afternoons at a Preppy Mountain Farm

Our relaxed pace continues into our afternoons, at least for this week.  After lunch, we spend the next several hours enjoying the summer by...

climbing trees, such as this cherry tree that has seen better days...

snacking on homemade yogurt pops or freeze pops, depending on what we have in our freezer...

taking a dip in the pool (some of us dip less than others)...

practicing our instruments so we don't get too rusty over summer break...

taking catnaps on the front porch...

and in creative pursuits, such as trying new recipes,

building with Legos,

and in new nail designs.

We usually avoid doing much farm work or outdoor chores in the afternoons and do what most people did before air conditioning became available.  Our century old farmhouse still has no central cooling system; although, we do break out a window unit for the really hot and humid days.  Last summer was so mild in the Northeast that we only had it turned on a few times the entire season.  We have already had it on more than that this summer.  After the long winter we had, I am not complaining.

Monday, June 15, 2015

Summer Mornings at a Preppy Mountain Farm

Years ago, when we first began this farming adventure, and while we were still homeschooling all the younger children, someone asked me what our days look like.  Now that everyone is home on summer break, life feels much like it did then.  This is a glimpse into our summer mornings on a preppy mountain farm.

Walking barefoot in the dewy grass that always seems to need mowing.

Enjoying coffee and a look at the latest Country Living magazine on my porch rocker, which was a Mother's Day gift from Cracker Barrel last year.

Collecting eggs, which is now a daily egg hunt since the hens are currently free-ranging...

...and picking vegetables from the garden before it gets too hot and buggy.

Walking Tippy on one of our mountain paths.  I think she was waiting for me to join them.

Checking out growing fruit and hoping the apples will survive the chipmunk population this summer.

Playing a game of checkers or other board game on the front porch.  Note that painting our 3 porches is on the summer project to-do list this year.

I hate to admit that there is a little bit of electronic use too.

Minecraft, Age of Empires, and Pinterest are particularly popular in our house right now.


Sprucing up my middle aged feet with these cool footless beaded sandals made for me by my teenage daughter a few years ago at a summer camp.

I cherish these lazy mornings at home and fight the pressure to over-schedule our summer days with too many day trips, camps, lessons, sleepovers, or playdates.  There is some of that, of course, but I really hope our children grow up with memories of summer vacations filled with time to relax, to daydream, to even get a little bit bored.  I guess I want these summers while the children are still relatively young to feel as if they are occurring in slow motion.

Saturday, June 13, 2015

Favorite Summer Dinner: Pasta Primavera


One of our favorite meals on the farm during the hot summer months is pasta primavera.  It's light, simple to make, and uses whatever summer vegetables we have in our gardens or what we have purchased from local farmers markets or Amish neighbors.  This past week, I actually used whatever I had left in the refrigerator, which happened to be onions, green peppers, mushrooms, and garlic.  I think the garlic is essential.


I used to saute the vegetables in butter, but due to gallbladder issues, we have switched to olive oil.  This is also more in line with the anti-inflammatory diet my husband and I try to adhere to as much as possible.

My husband has me hooked on cooking in cast iron skillets.  The only seasonings I added to this were salt and pepper, but if I use greens such as Swiss chard, kale, or spinach, I also add either balsamic vinegar or a locally made maple vinegar near the end of the cooking time.  Serve over the finished pasta, and add Parmesan cheese if desired.  Sometimes I sprinkle on some fresh parsley or oregano from our herb beds.  This is filling, tasty, but still light enough to go back outside to finish up weeding, mulching, mowing, or moving fence panels.  If it's a more relaxing evening, the meal is not too heavy to be followed by a dip in the pool or a hike up the mountain.  We often eat this weekly during the summer months.

Tuesday, June 9, 2015

Healthy Sweets Kids Love to Make: Honey Balls


Our family is always on the lookout for good-tasting, healthy sweets that are quick to make.  If they are fun for the children to mix up and put together, that's a double bonus.  A recipe that I have been using for decades that we never tire of is for Honey Balls.


Just four ingredients are used, and this only takes about 15 minutes to create, depending on how many little helpful hands you have. 


 In a smaller mixing bowl, stir together 1/2 cup of peanut butter and 1/2 cup of honey.  In another bowl, mix 1 cup of quick oats and 1 cup of dry milk powder.  Then just add the wet ingredients to the dry and mix well.  I have to get in there with my hands to get it thoroughly combined.  This is part of the fun of it if you have children who like to get gooey.  I have one child who does not.


Finally, everyone gets to roll it into small balls and then refrigerate.  Licking the extra sticky goo off fingers is optional.